Root canals have a reputation problem. Most people approach the idea of one with more dread than the procedure itself warrants. A lot of that comes from not knowing what actually happens during treatment, and the imagination tends to fill gaps with worst-case scenarios.
The procedure is straightforward once you understand what it involves. Here's what's actually happening inside a tooth from start to finish.
Why a Root Canal Becomes Necessary
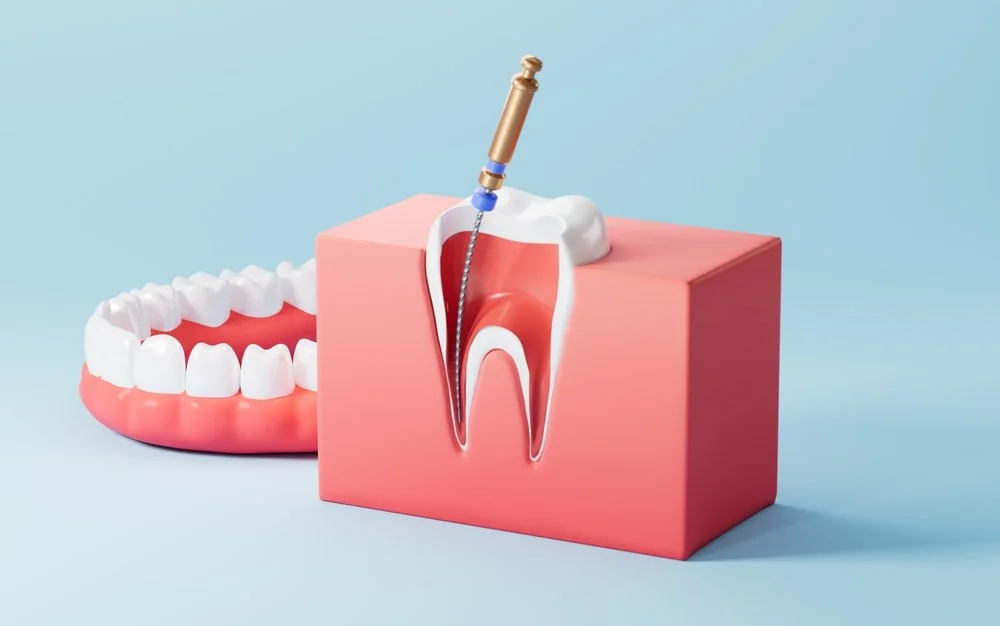
A tooth has layers. The outer layer is enamel. Below that is dentin, a softer material that makes up the bulk of the tooth. In the centre is the pulp, a soft tissue containing blood vessels, nerves, and connective tissue that helps the tooth develop. Once a tooth is fully formed, the pulp isn't essential to the tooth's function, but it can still cause serious problems if it becomes infected.
Pulp infection typically happens in one of two ways: a cavity that's been left untreated long enough to reach the pulp chamber, or a crack or fracture that allows bacteria inside. In either case, infection in the pulp can spread through the root canals into the surrounding bone if it isn't addressed.
A root canal removes the infected or damaged pulp, cleans the interior of the tooth, and seals it. The tooth stays in place. That's the goal.
Step by Step: What Happens During the Procedure
Freezing the Area
The first step is a local anesthetic. The area around the tooth is numbed before any work begins. This is the part most patients anticipate with the most anxiety, but for many people a tooth that's already inflamed and infected is more uncomfortable before treatment than during it.
Once the anesthetic has taken effect, the dentist checks that the area is fully numb before proceeding.
Opening the Tooth
The dentist drills a small opening through the top of the tooth to access the pulp chamber. For a back molar, this opening goes through the chewing surface. For a front tooth, it goes through the back. The opening needs to be large enough to allow instruments to reach the root canals below.
Removing the Pulp
Small instruments called files are used to remove the pulp tissue from the pulp chamber and from each root canal. Molars typically have two to four root canals; front teeth usually have one. The files also shape the canals to prepare them for filling.
An irrigation solution is used throughout this stage to flush out debris and reduce bacteria inside the tooth. The combination of mechanical cleaning and irrigation is what makes the procedure effective at clearing infection.
Shaping and Drying the Canals
Once the pulp is removed and the canals are cleaned, they're shaped into a smooth, tapered form that allows the filling material to seat properly. The canals are then dried thoroughly before the next step.
Filling and Sealing
The cleaned canals are filled with a rubber-like material called gutta-percha. It's pressed into the canals to fill the space completely, then sealed with a dental cement. The goal is an airtight seal that prevents bacteria from re-entering.
The access opening in the top of the tooth is filled with a temporary or permanent filling at this stage, depending on the treatment plan.
The Crown Appointment
A root canal on its own doesn't fully protect the tooth. Removing the pulp leaves the tooth more prone to fracture over time, particularly for molars that take heavy chewing forces. In most cases, a crown is placed over the tooth after root canal therapy to restore its strength and protect it from cracking.
The crown appointment is typically scheduled as a separate visit once the tooth has settled.
What to Expect Afterward
Some tenderness around the treated tooth is normal for a few days after the procedure. Over-the-counter pain medication is usually enough to manage it. The tooth may feel slightly different when biting for a short period while the surrounding tissues settle.
The tooth itself no longer has nerve tissue inside, so it won't respond to temperature or pressure the way a vital tooth does. That's expected and normal.
If pain is severe or worsening after the first couple of days rather than improving, that's worth a call to the dental office. Persistent symptoms can occasionally indicate that additional treatment is needed.
About Selkirk Crossing Dental Centre
Selkirk Crossing Dental Centre is a general dental practice at Unit 3, 1012 Manitoba Avenue in Selkirk, MB. The clinic offers a full range of dental services, including root canal therapy, crowns and bridges, and dental emergency care, with digital X-ray technology used throughout the diagnostic and treatment process.
Book an Appointment at Selkirk Crossing Dental Centre
Selkirk Crossing Dental Centre, Unit 3, 1012 Manitoba Avenue, Selkirk, MB Questions about root canal therapy or a tooth that's been bothering you? Call your Selkirk dentist at (204) 481-4484 to book an appointment.